Every sale starts with a customer. When you save your customers' names, contact numbers, and addresses in one place, creating invoices, recording receipts, and tracking outstanding dues becomes much faster. To add customer in Vinimay, open your Dashboard and navigate to Settings > Customers. You can enter customer details, save contact information, add applicable GST details, and manage customer records with a few simple steps. This guide walks you through the process step by step.
Why Add Customers in Vinimay?
Select customers quickly when creating sales transactions.
Track outstanding payments through the Customer Ledger.
Store contact details, addresses, and GST information in one place.
Find customer records easily using the search feature.
Step 1: Open Settings from the Dashboard
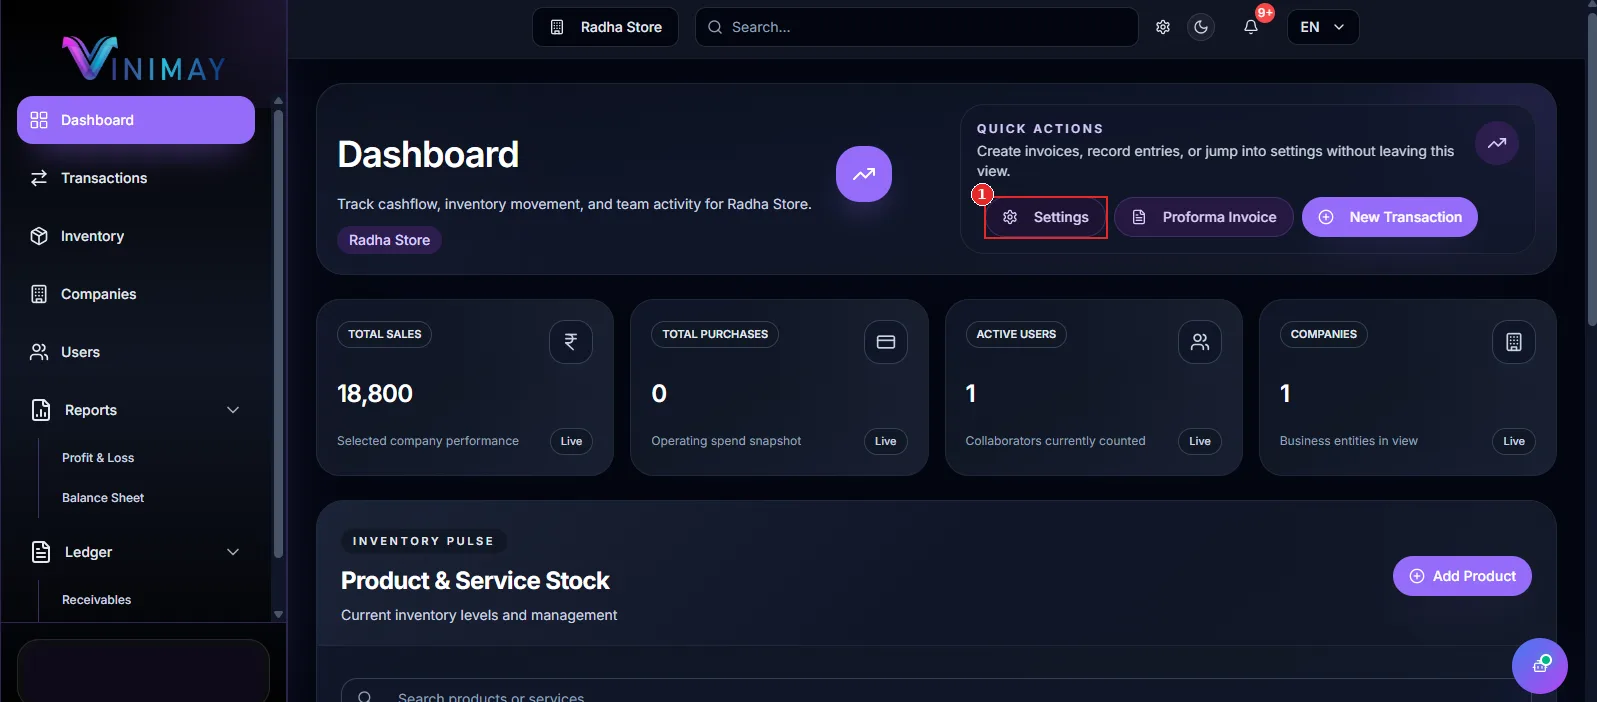
Log in to your Vinimay Client account. On the Dashboard, locate the Quick Actions area and click Settings (marker 1).
Step 2: Go to the Customers Tab
The Settings page opens on the Permissions tab. Check whether Create Customers shows Enabled (marker 2). This indicates that your plan allows you to add customers.
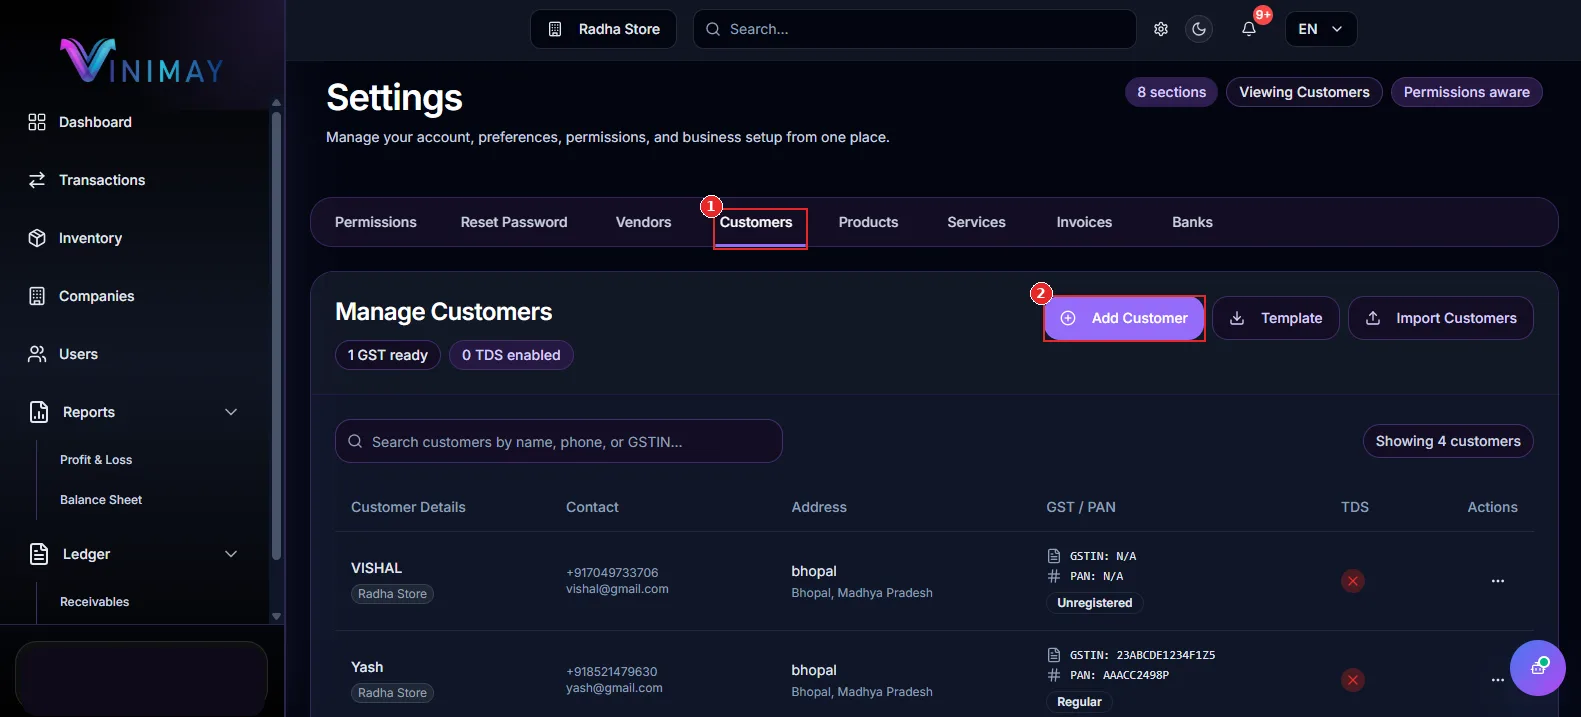
Next, click the Customers tab (marker 1) to open the customer management section.
Step 3: Click Add Customer
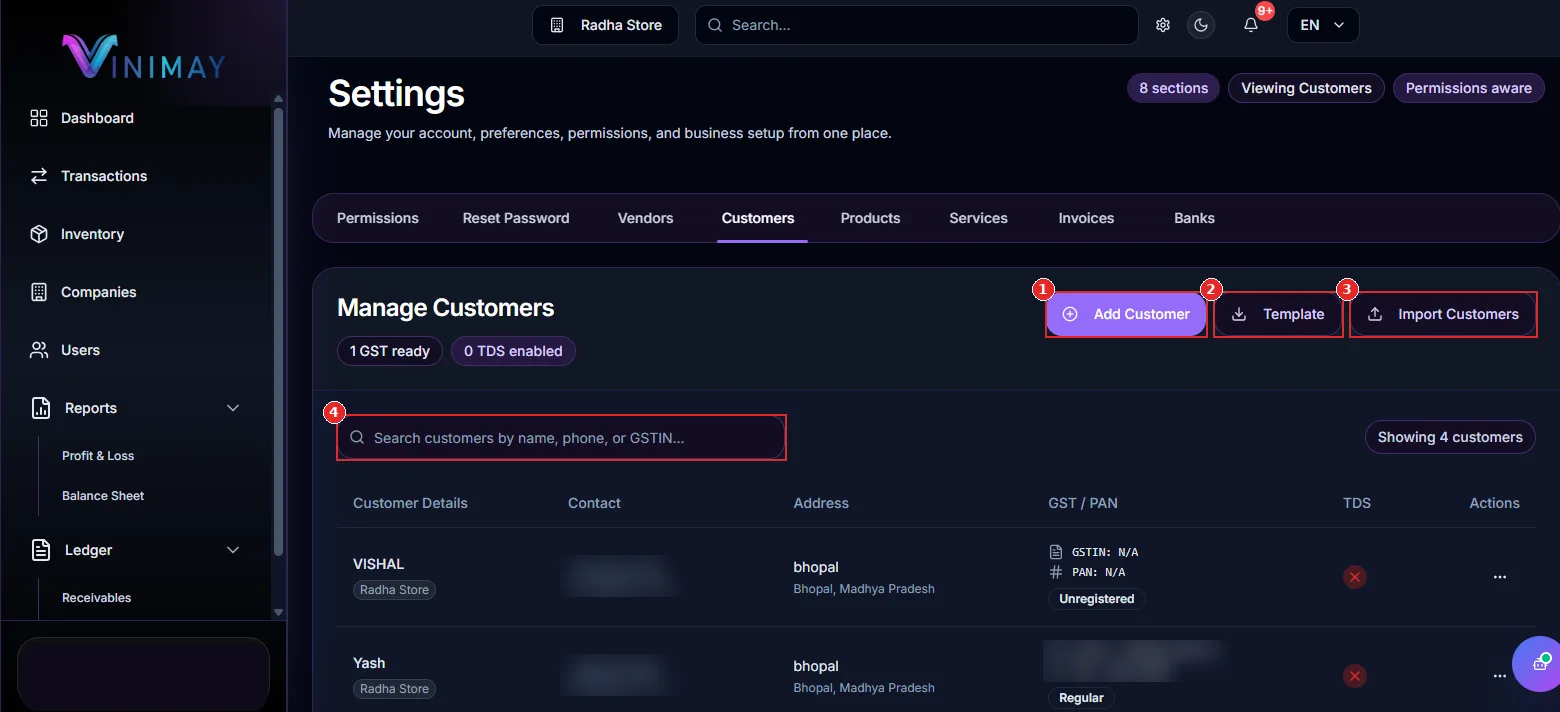
The Manage Customers page displays your existing customer records, a search box, and three buttons at the top right.
Add Customer (marker 1): Click this button to add an individual customer using a form.
Template (marker 2): Download the customer template if you want to add multiple customers together.
Import Customers (marker 3): Upload the completed template to import customer records in bulk.
Search (marker 4): Find an existing customer by name, phone number, or GSTIN.
If you only need to add one customer, click Add Customer and proceed to the customer details form. If you have many customers, using the template and import options can save time.The Search box (marker 4) helps you find an existing customer by name, phone number, or GSTIN.
Step 4: Fill In the Create New Customer Form
Click Add Customer to open the Create New Customer form. Fields marked with a red star are required.
Screenshot 4: Create New Customer Form
The form contains the following fields:
Company (marker 1): Select the company the customer belongs to, such as Radha Store. This field is required.
Customer Name (marker 2): Enter the customer's name, such as John Doe. This field is required.
Mobile Number / WhatsApp (marker 3): Enter the customer's mobile number. The +91 country code may already be filled in.
Email ID (marker 4): Enter the customer's email address, if available.
Address Line (marker 5): Enter the customer's street address.
State (marker 6): Select the customer's state.
City (marker 7): Enter the customer's city.
Pincode (marker 8): Enter the postal code.
Scroll down inside the form to check whether any additional fields are available. Tax details, such as GSTIN and PAN, may also be available and can appear in the customer list afterward.
Tip: Save the customer's mobile number to make communication and payment follow-ups easier when payments are pending.
Step 5: Click Create Customer and Check the List
After entering the details, click Create Customer (marker 9). The new customer should now appear in the Manage Customers list.
Screenshot 5: Customer Added to the List
The customer list displays important information to help you manage your records:
Summary badges (marker 1): Show the total number of customers and relevant GST and TDS statuses.
Customer name and company (marker 2): Display the customer's name and associated company.
Contact details (marker 3): Show available contact information.
GST / PAN and registration status (marker 4): Display available tax information and statuses, such as Unregistered or Regular.
Actions menu (marker 5): Provides available options for managing the customer record.
Review the saved details to make sure the customer is associated with the correct company and the contact information is accurate.
Quick Recap
Open the Dashboard and click Settings.
Select the Customers tab.
Click Add Customer.
Enter the company, customer name, and other available details.
Click Create Customer and verify the customer in the list.
Tips for Managing Customers
Use clear customer names: Enter complete names so records are easy to identify.
Add mobile numbers: Keep contact details available for payment reminders and follow-ups.
Enter GSTIN when applicable: Add GST information for business customers who require GST invoices.
Use Import Customers: If you already maintain a customer list in Excel, use the Template and Import Customers options to save time.
Review the Customer Ledger: Check customer balances regularly to identify outstanding payments.
Frequently Asked Questions
1. Where do I add a customer in Vinimay?
Go to Settings, open the Customers tab, and click Add Customer. Fill in the required details and click Create Customer.
2. Which fields are required?
Company and Customer Name are marked as required. Other fields may be optional, but adding a mobile number and address is recommended for better record management.
3. Can I add many customers at once?
Yes. Click Template to download the required format, fill in the customer details, and use Import Customers to upload the completed file.
4. How do I find a customer later?
Use the search box on the Manage Customers page to search by customer name, phone number, or GSTIN.
5. Why can't I add a customer?
Open Settings and check the Permissions section. Confirm that Create Customers is marked Enabled for your plan. If it is not enabled, contact your account administrator or Vinimay support for assistance.
Conclusion
Adding a customer in Vinimay is quick and simple. Open Settings, go to Customers, click Add Customer, enter the required information, and select Create Customer. Finally, check the Manage Customers list to confirm that the record has been saved correctly.
Keeping customer names, contact numbers, addresses, and applicable tax details updated makes it easier to create sales transactions, manage invoices, record receipts, and follow up on outstanding payments.
Related Topics
Published by admin
Our editorial and compliance specialists create practical guides, tax calculation rules, and operational strategies to empower Indian small business owners and accountants.