Step 1: Open Restaurant & Cafe
First, log in to Vinimay using your registered client login or user login credentials. After logging in, select the restaurant or cafe company where you want to configure dining tables. If your account manages multiple businesses, confirm that you have selected the correct restaurant.
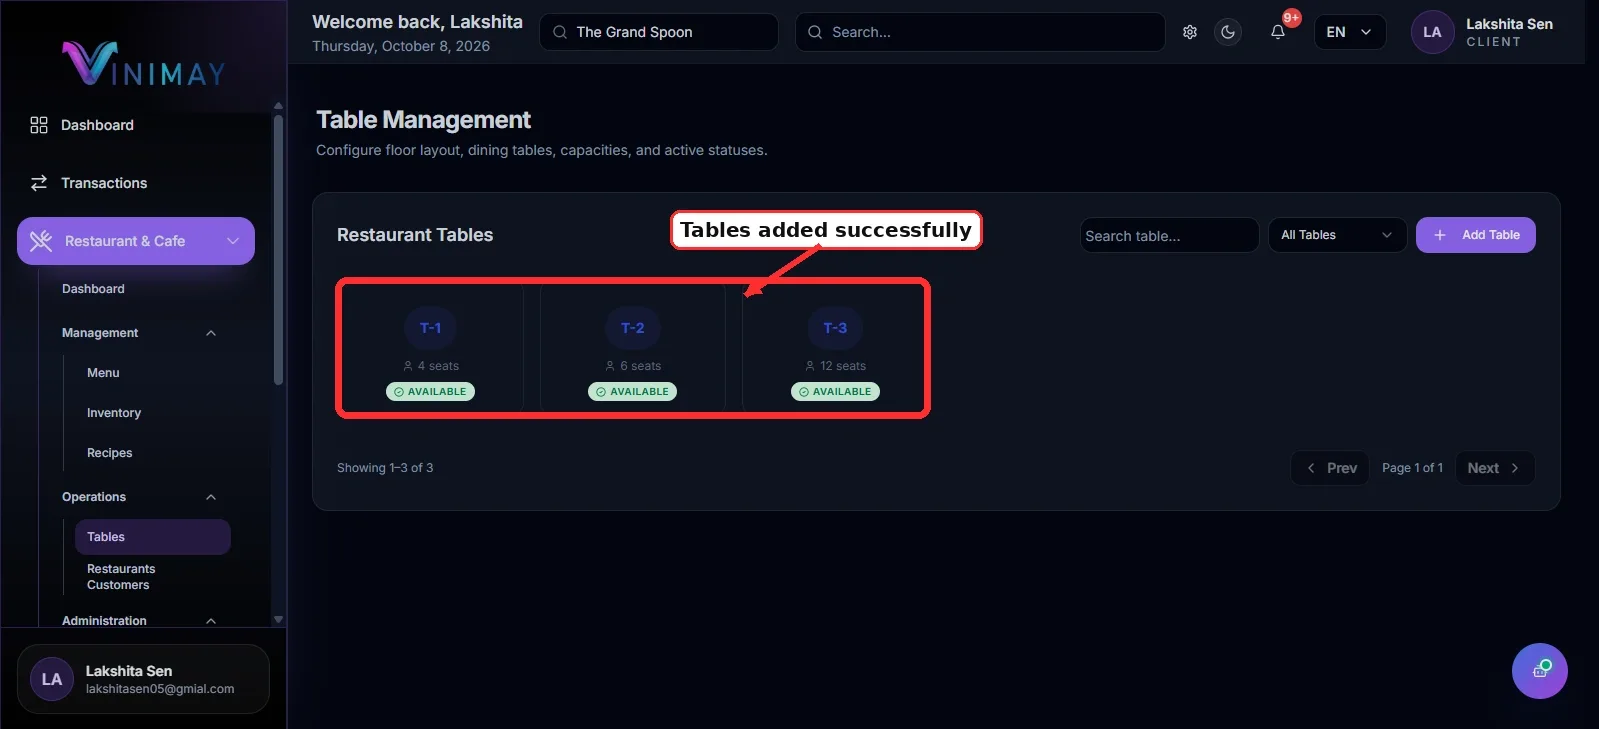
From the left-side navigation menu, click Restaurant & Cafe to access the restaurant management features.
This section provides access to the available tools for managing restaurant operations, including table configuration, depending on your account setup.

Step 2: Open Tables
After opening the Restaurant & Cafe section, look for the Operations section in the navigation menu.
Under Operations, click Tables to open the table management page.
This page is used to view and manage the dining tables configured for your restaurant. If you have already created tables, review the existing list to avoid adding duplicate entries.
If the Tables option is not visible, check your account permissions or contact your administrator for assistance.

Step 3: Click Add Table
On the Tables page, look for the Add Table, New Table, or similar button used to create a new dining table.
Click the available option to open the table creation form.
This form allows you to enter the basic information for each table so staff can identify it when handling dine-in orders.
Before proceeding, decide how you want to number your tables. Using a consistent naming system makes it easier for employees to locate the correct table during busy service hours.

Step 4: Enter Table Details
Fill in the required fields in the table creation form. Depending on your Vinimay setup, you may be able to enter details such as:
Table Name or Number: Enter a unique name, such as T1 or T2.
Seating Capacity: Specify how many customers the table can accommodate.
Floor or Section: Select the relevant dining area if this option is available.
Table Status: Choose the applicable status if the form provides this field.
For example, you could enter T1 as the table name and 4 persons as its seating capacity.
If your restaurant has separate indoor and outdoor seating areas, use clear table names or sections where supported. This helps staff identify the right table quickly and reduces confusion when serving customers.
Review the information to ensure the table details are correct.

Step 5: Save the Table
After entering the required information, review the table name, seating capacity, and any additional details.
Click Save, Create Table, or the available confirmation button to complete the process.
Once the table is saved successfully, return to the Tables page and check whether it appears in the list.
If the table does not appear, review any error messages and confirm that all mandatory fields have been completed correctly.
Saving the table ensures it is registered in your restaurant's configuration, subject to the features enabled in your account.

Step 6: Add More Tables
Repeat the same process to add the remaining dining tables in your restaurant.
For example, you might create:
T1 – 4 persons
T2 – 2 persons
T3 – 4 persons
Family Table – 6 persons
Outdoor Table – 4 persons
Use a clear and consistent naming system that matches your restaurant's seating arrangement.
Adding all your tables helps staff identify seating options more easily and supports smoother coordination between the service team and kitchen.
Step 7: Use Tables for Dine-In Orders
After creating your tables, staff can select the appropriate table while taking a dine-in order, provided table selection is enabled in your Vinimay setup.
Depending on the features available, the system may display table statuses such as Available, Occupied, Reserved, or Running Order.
Staff can use this information to identify available seating, monitor active orders, and coordinate customer service.
Make sure employees understand how to select the correct table and update its status when required.
Quick Path
Login → Select Restaurant → Restaurant & Cafe → Operations → Tables → Add Table → Enter Details → Save
Once your tables are configured, you can proceed with setting up menu items, assigning staff, and managing dine-in orders through the restaurant features available in Vinimay.
Related Topics
Published by Team Vinimay
Our editorial and compliance specialists create practical guides, tax calculation rules, and operational strategies to empower Indian small business owners and accountants.