Electricity bills, rent, medical costs, and repair charges can add up quickly for any business. Without proper expense tracking, it becomes difficult to understand where money is being spent and how expenses affect profitability.
Vinimay Accounting Software helps you record business expenses under specific categories and review your spending in one place. This guide explains how to record an expense, view expense totals by category, filter records by date, and access individual expense entries using the Expense tab.
Why Is Expense Tracking Important?
Tracking business expenses helps you:
Understand where your business money is going.
Monitor spending across different expense categories.
Maintain organized financial records.
Review monthly expenses and identify unnecessary costs.
Prepare financial information for your accountant.
Make better budgeting and business decisions.
Part 1: Record an Expense in Vinimay
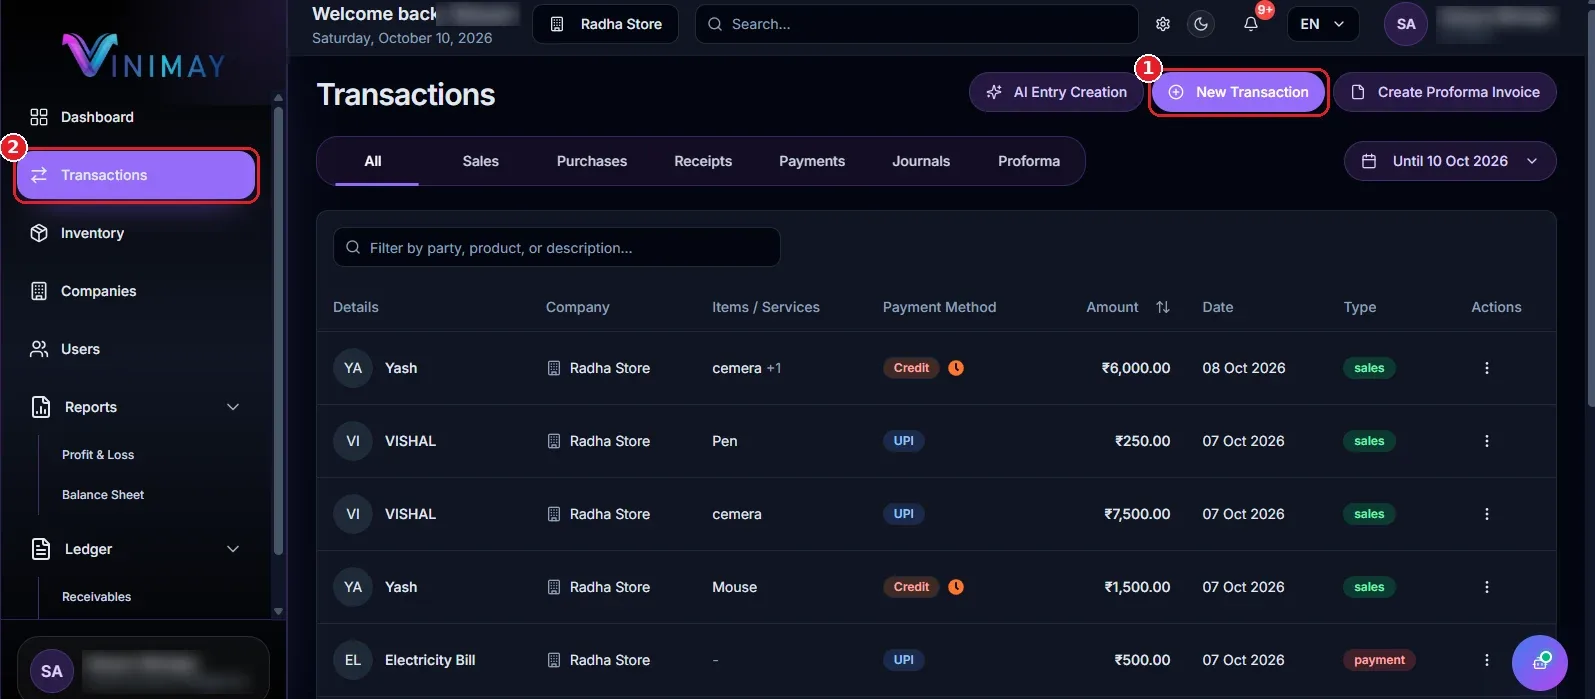
Step 1: Start a New Transaction from the Dashboard
Log in to your Vinimay Client account.
Open the Dashboard.
Find the Quick Actions section.
- Click New Transaction (Marker 1).
Step 2: Choose the Payment Tab
In the Create Transaction window, locate the available tabs.
Click Payment (Marker 1).
Find the Expense checkbox (Marker 2), which displays the note “Check if this is an expense.”
When the Expense checkbox is not selected, the form displays a Vendor field (Marker 3) for recording payments to vendors.
To record a business expense directly, select the Expense checkbox in the next step.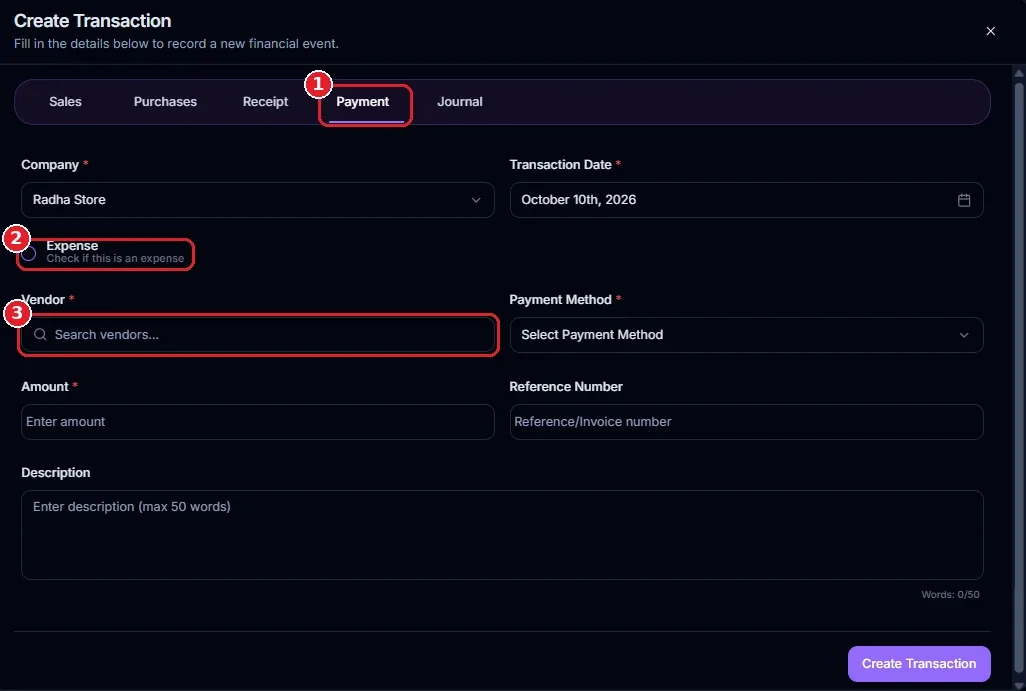
Step 3: Select Expense and Fill In the Details
Tick the Expense checkbox. The Vendor field will be replaced by the Expense Category field.
Complete the required information:
Company and Transaction Date: Check that the company and transaction date are correct. Both fields are required.
Expense Category (Marker 3): Select the relevant category, such as Medical or Electricity Bill.
Payment Method (Marker 4): Choose how you paid, such as UPI. This field is required.
Amount (Marker 5): Enter the expense amount. For example, enter ₹1,500 for a medical expense. This field is required.
Reference Number (Marker 6): Optionally enter a bill number, invoice number, or another reference.
Description (Marker 7): Add a short note about the expense. The description can contain up to 50 words.
After checking the details, click Create Transaction (Marker 8) to save the expense.
Tip: If a message appears saying “You have a saved draft,” click Restore Draft to continue your previous work or Clear to start a new transaction.
Step 4: Check the Expense in Transactions
After saving the transaction, verify that your expense has been recorded.
Open Transactions from the left sidebar.
Select the Payments tab (Marker 2) to view payment transactions.
Find your recently recorded expense in the list.
The expense should appear as a payment, with the expense category displayed as its name.
For example, an electricity bill of ₹500 paid through UPI may appear as an Electricity Bill payment.
Checking the transaction helps you confirm that the expense was recorded correctly.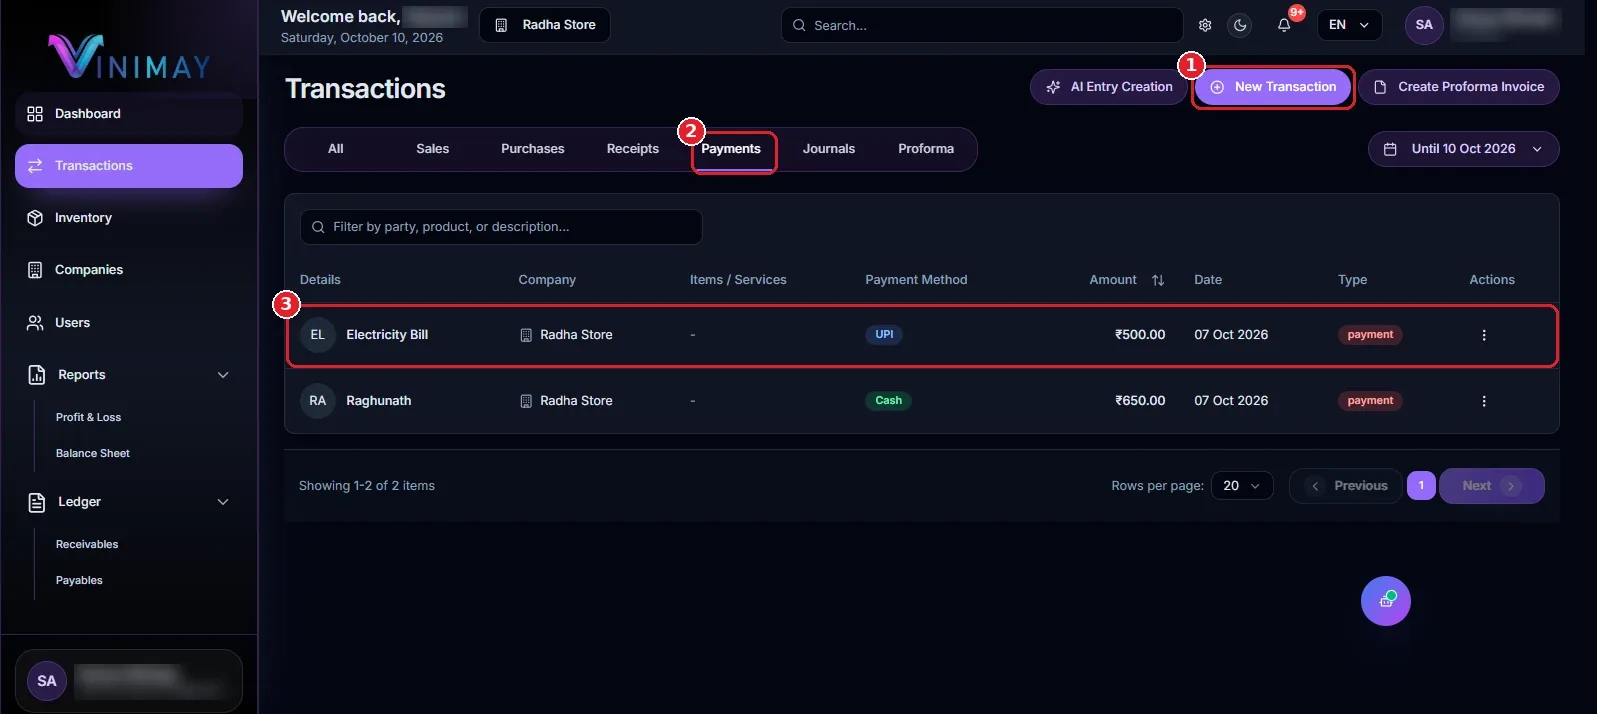
Part 2: View Expenses in the Expense Tab
Step 5: Open Ledger → Payables
After recording the expense, return to the Dashboard or use the left sidebar.
Click Ledger (Marker 1).
Select Payables (Marker 2).
The Vendor Account page will open. This page displays vendor information, filters, summary cards, and a View Ledger option for individual vendors.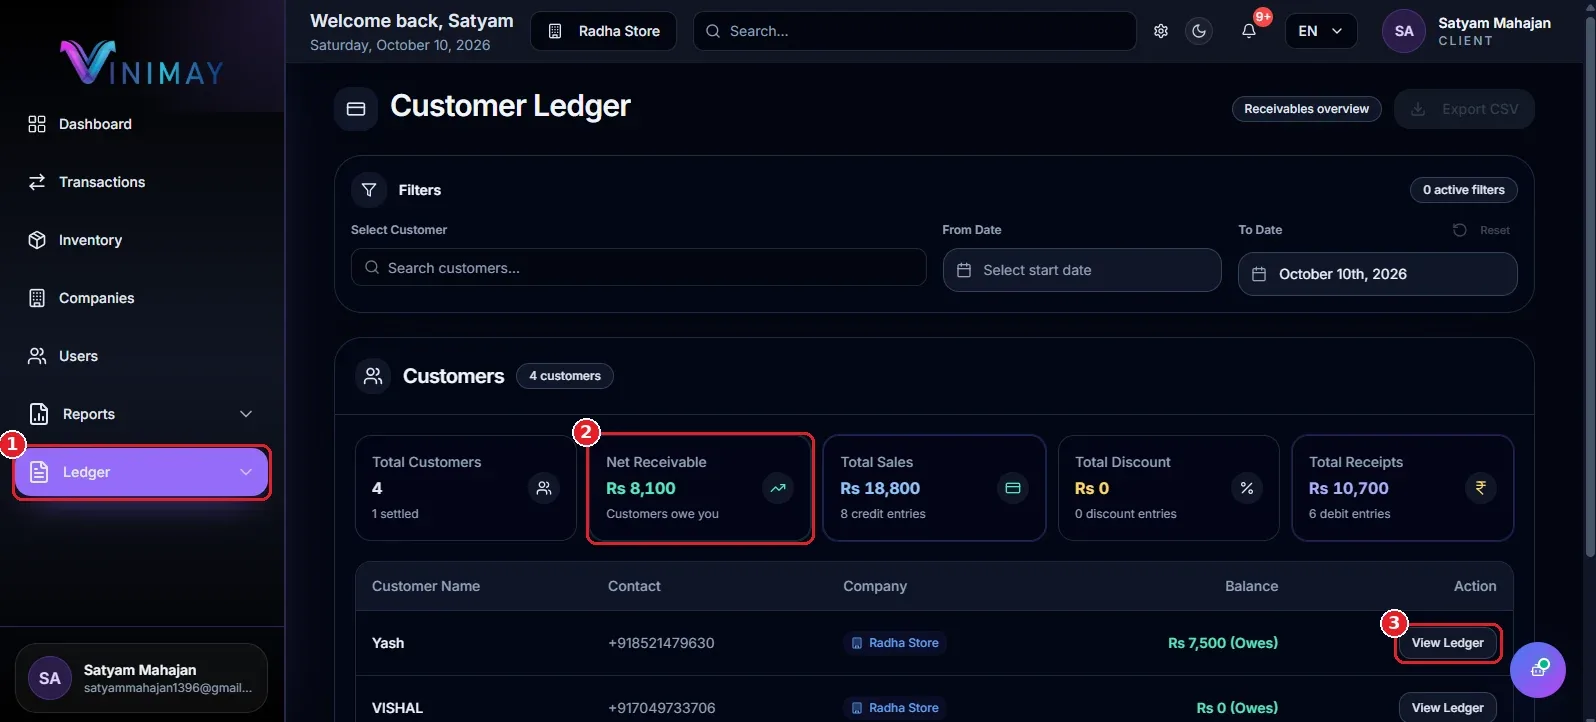
Step 6: Switch to the Expense Tab
At the top-right corner of the Vendor Account page, you will find a switch between Vendor Account and Expense (Marker 1).
Locate the Vendor Account / Expense switch.
Click Expense.
Wait for the Expense Account page to open.
The Expense tab allows you to review expenses grouped by category instead of viewing vendor accounts.
Step 7: Review the Expense Account Page
The Expense Account page displays expense categories and the amount recorded under each category.
Here is what you can review:
Expense Category Filter (Marker 3): Search for a specific expense category.
From Date and To Date (Marker 4): Select a date range to review expenses for a particular period.
Summary Cards (Marker 5): Review the total number of expense categories and the total amount spent.
Category List: Check the amount recorded under each expense category.
View Ledger (Marker 6): Open the entries behind a category's total.
Export Category (Marker 2): Export the available expense category data.
For example, suppose your business records the following expenses:
Medical: ₹1,500
Electricity Bill: ₹500
Your total expenses would be ₹2,000 across two categories.
You can use the category list to understand where the money was spent and select View Ledger to inspect the individual entries for a category.
The date filters are useful when you want to review monthly expenses, compare different periods, or check spending within a particular financial period.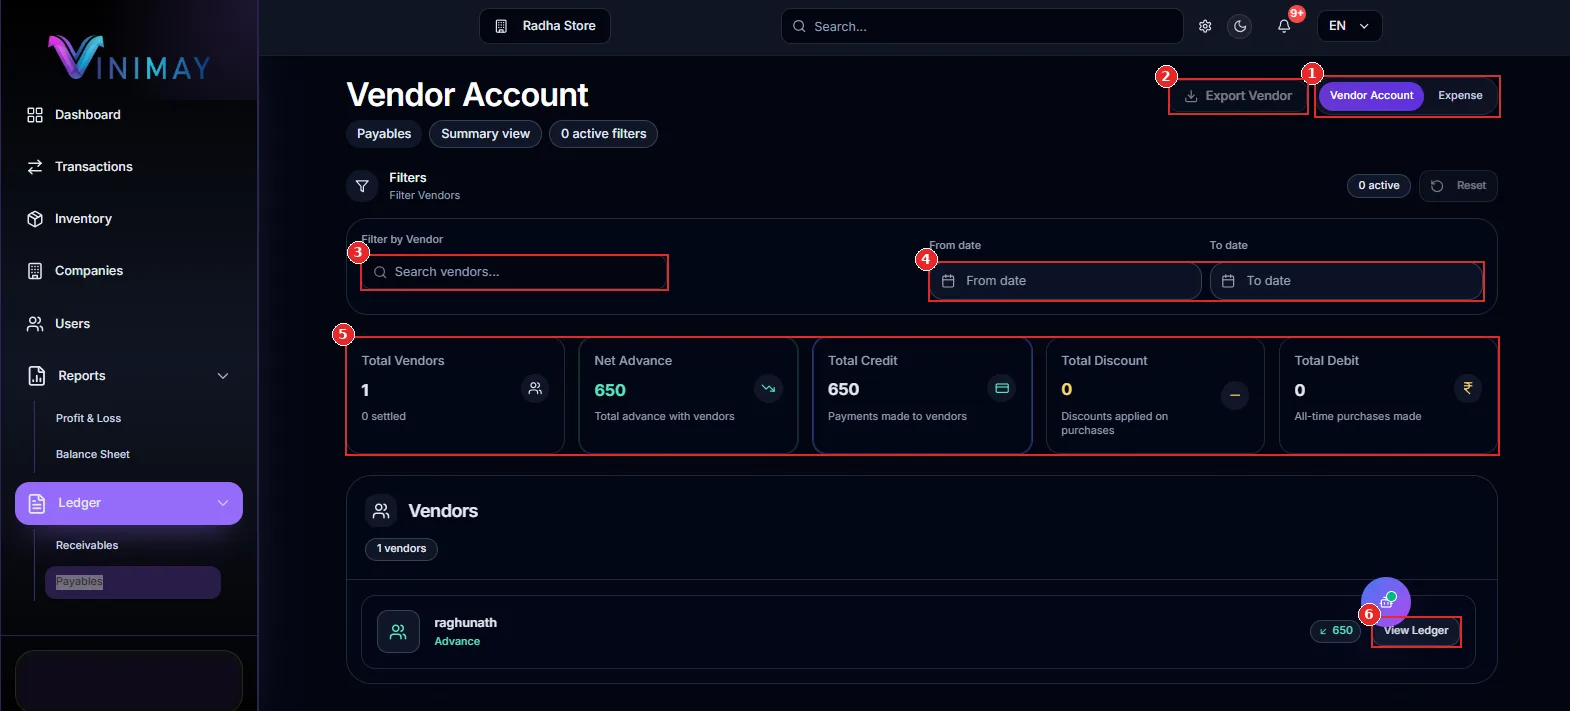 Quick Recap
Here is a quick summary of how to use the Expense tab in Vinimay:
Open the Dashboard and click New Transaction.
Select the Payment tab.
Tick the Expense checkbox.
Enter the expense category, payment method, and amount.
Click Create Transaction.
Open Ledger → Payables.
Click the Expense switch to review category-wise totals.
Tips for Tracking Business Expenses Better
Record expenses promptly: Enter expenses on the day they occur to reduce the risk of missing transactions.
Choose suitable categories: Use clear categories, such as Electricity Bill, Medical, Rent, and Repairs.
Add reference numbers: Include bill or invoice references when available to make future verification easier.
Review expenses monthly: Use the date filters to understand spending patterns and compare periods.
Separate expenses from vendor payments: Use the Expense checkbox for transactions that should be recorded as expenses rather than ordinary vendor payments.
Check individual entries: Use View Ledger to review the transactions contributing to a category's total.
Frequently Asked Questions
1. Where is the Expense tab in Vinimay?
Go to Ledger → Payables. On the Vendor Account page, click the Expense switch at the top-right corner to open the Expense Account page.
2. How do I record an expense in Vinimay?
Click New Transaction, open the Payment tab, select the Expense checkbox, enter the expense category, payment method, and amount, and click Create Transaction.
3. What is the difference between a vendor payment and an expense?
A vendor payment uses the Vendor field to identify the vendor being paid. When you select the Expense checkbox, the form uses an Expense Category instead. Choose the appropriate transaction type based on the nature of the payment.
4. Can I view expenses for a particular period?
Yes. Use the From Date and To Date filters on the Expense Account page to review expenses for your selected period.
5. Where can I check my total business expenses?
Open Ledger → Payables → Expense. The Expense Account page displays summary information, including the total amount spent.
6. Can I view individual transactions within an expense category?
Yes. Click View Ledger next to the relevant expense category to review the entries contributing to that category's total.
Conclusion
The Expense tab in Vinimay makes it easier to record business expenses and understand where your money is going. Start by creating a payment transaction and selecting the Expense checkbox. Then open Ledger → Payables → Expense to review category-wise totals, filter records by date, and inspect individual entries.
By recording expenses regularly and reviewing them each month, you can maintain better financial records, monitor spending patterns, and make more informed business decisions.
Published by admin
Our editorial and compliance specialists create practical guides, tax calculation rules, and operational strategies to empower Indian small business owners and accountants.